1.19.2012

Jager, my model

Jager, my 5-year old pup, was recently featured on Desire to Inspire's recent "Monday's pets on furniture" post!  Check out his amazing modeling skills below!


Here is my long-haired miniature dachshund, Jager, on a few different chairs in the house (he likes to sit up high on furniture like a cat; I think it's short legs syndrome!)
Kara


You can check out Desire to Inspire's Pets on Furniture post each Monday...if you like cooing over cute cats and dogs lying on furniture!

1.16.2012

TOH Contest Entry

Check out Makenzie's Room on This Old House!


The project was entered into the 2012 Reader Remodel Contest under the "Paint Ideas" category!  You might remember my post a while back about her bedroom transformation; No More Princess...

...who knows you might see some familiar photos in the late summer issue of This Old House!  Keep your fingers crossed!
_________________________________________________

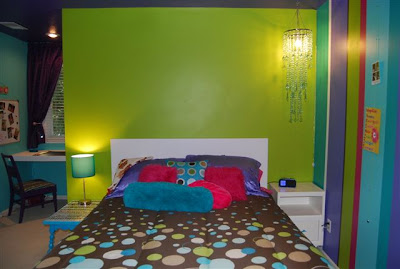
Bright Stripes Perfect for Niece 
Sent by: Kara K., Prairie Village, KS

Image 1 of 6: After: Striped wall


Remodel timeline: Less than a year

The hardest part: The hardest part was waiting for certain colored stripes to dry on the wall before being able to paint more stripes next to those — had to go in phases. We used frog tape and taped almost every other stripe along pencil lines we drew with a level for the first round. Plus, they needed a few coats.

How we saved money: We built a floating desk in the back corner with a light above for her to do her growing amount of homework. We made a chandelier ourselves, did our own painting, and bought a few pieces of furniture from garage sales and repurposed them with paint, tile, fabric, and hardware!

               _______________________________________________


1.12.2012

Finished Laundry


We finally put the finishing touches on our laundry closet!


You might remember what the area looked like before we even started the project or since I last posted about it:


To flashback and see the process it took to create our laundry room- click here for the full post


To build the countertop:

First, we screwed 2" strips of MDF onto the walls to support the countertop- making sure to screw into the studs.  We put them at the height we wanted the bottom of the counter to be [machines required >1" space above them] and made sure the supports were level.  The side supports were cut 3" shorter than the depth of the countertop so they set back visually a little bit.


[In hind-sight, this step would have been much easier before the machines were here.  It was very tricky to get the drill at the right angle to screw them in without the machines being in the way, but we didn't have much choice since the washer/dryer were on special and had to be delivered by a certain date]

I also used this time without the countertop in to paint the supports the same color as the wall since you will see the front of them!


 We measured and cut a large piece of 3/4" MDF plywood for our countertop to lay on top of the supports (just did a dry-fit to make sure it was the right size)


 We also cut a notch into the countertop to allow for the hoses.  We had the plumber install the water valves above the machines so it was easier to reach them if we needed to turn them off.  It would have been very difficult to get to them if they were directly behind the washer and under the countertop! 

Next, we laminated the countertop with Formica.  I didn't think about taking any photos of the laminating process...whoops  :(


 To laminate: we took the top outside and layed it on two sawhorses.  We glued the gray stainless-steel-like formica onto our MDF countertop using DAP Weldwood non-flammable contact cement.  You roll/paint it onto the wood and the back of the formica then let it dry for 30-40 minutes.  Then we carefully laid our pre-cut formica [an inch bigger than the wood on every side] over it- making sure to roll out any air pockets from the center outward.  

After that, we borrowed a friends' router and used a laminate flush trim bit we bought to rout the excess formica off of the edges.  Then we did the same steps all over again for the front edge of the countertop and used wood glue to glue the whole top to the wall supports!


We used the old cabinet from our bathroom [pre-remodel], painted it white, added new hardware, and hung it for laundry detergent etc...  Then added thin pre-primed trim around the cabinet to finish the edges, caulked, and painted it.


I desperately needed a space to hang clothes to dry, so we added a pole from the cabinet to the wall


 I also created this sign for hanging "lost socks" by using a metal sign I found at World Market and gluing little wooden clothespin clips to it!


 Ahhhhh... Finally done!


1.04.2012

"Silverized" Christmas


So, I HAD to make a post solely about my amazing friends Susan, Sally, & Emily, especially after seeing their Christmas decor from my friend Lindsey's blog!  Here is their awesome family:


Since Susan is in the process of remodeling her home, she didn't hesitate one bit on spray painting things silver for Christmas!  These photos, taken by Lindsey, should seriously be published in a magazine.


Check out more photos and details of Susan Ebright's home decorated for Christmas on Lindsey's blog!


she even hand-made and screen-printed pillows!
[Papa is modeling the pillows and chicken footstool for the camera]


Susan & Sally are the creators and force behind The City Girl Farm which has made it's name known from the amazing handmade chicken footstools they sell!


They've made some big waves at art fairs across the country - being featured on the local news stations as well.  Here are some photos of their last booth in St. Louis:


They hand-dye, hand-spin, and hand-weave wool, sew, and screen print items among other things they find inspiring and want to challenge themselves to learn.  With backgrounds in Interior Design & Architecture - their capabilities are limitless!


For our church Farm Party this past fall, they were gracious enough to let us borrow two chickens for a day [for cute photo-ops] and donated screen-printed aprons, t-shirts, & onesies as raffle give-aways!


My husband, Matt, and I showing off [or riding] the chickens!


Kids LOVE them!

... and the winners are ...


see, real men wear chickens!


I wonder what they'll do next???

The City Girl Farm: