2.27.2012

Barcelona Bulldog

Desire to Inspire's "Pets on Furniture" post today was just too cute I had to share it!
Of course, I have a love hate relationship with bulldogs since my parents' own two.  But they are just so ugly- they're cute!


What a classy bulldog sleeping on a Barcelona Chair!  If only our's could be that design savvy!


I'm not even a Chihuahua fan, but I love this picture!


This is one of the photos my friend, Lindsey, took of her two cats, KC & Yogi, that I definitely think needs to be submitted...too adorable!


2.08.2012

Wood Slab

Help needed!

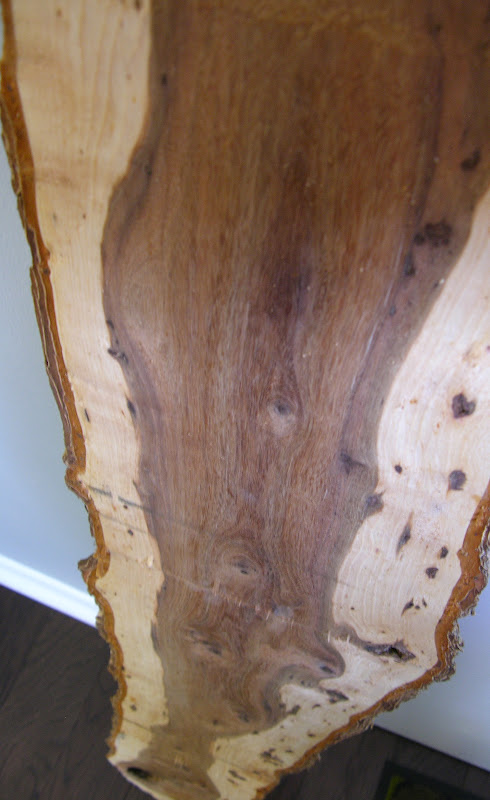
The other day Matt went out to help a friend chop down some trees and mill them into wood strips.  It's a tough and dirty job, but we're excited to have some free wood to use for future house projects (including wrapping the divider wall in our living room with horizontal strips)!  Still some more work to do on the logs, but he brought me home this live edge plank that I asked for!  I still need to sand down the flat edge to make it smooth and put a protective finish on it eventually.

 front

 back

 Now the questions is: what am I going to do with it?

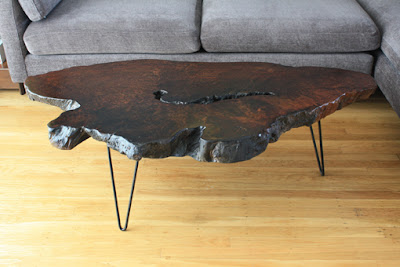
 Originally, I pictured something along the lines of a new coffee table made with mid-century hairpin legs:


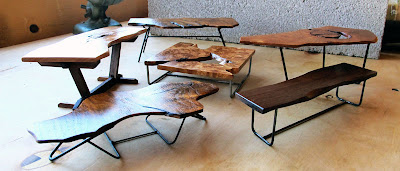
Check out these miniature wood tables handmade for dollhouses on etsy:

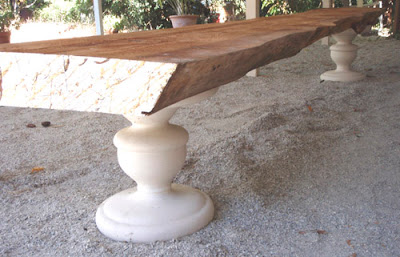
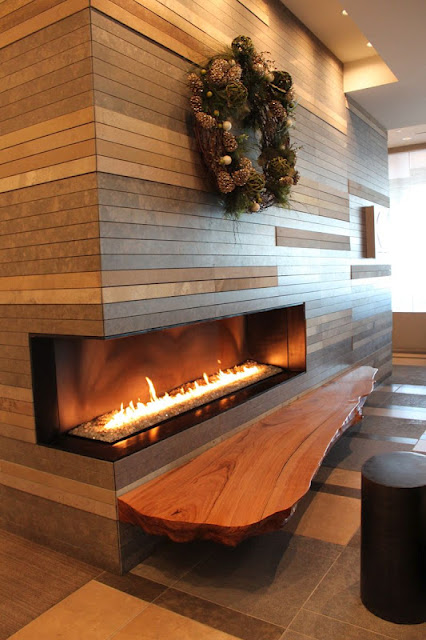
 I could still make it into a long narrow coffee table by adding some metal legs.  Here is a photo I took to help visualize what it would look like in my mind:


It would end up looking a lot like this one:

I've thought about turning it into a wall shelf.  I could put metal brackets under it and sit books on top of it.  Here was my visualization (not in that spot though):


I also wondered about hanging it flat on a wall like artwork over our sofa or in the hallway:


 or using it like a headboard in the same way in our guest room:


Here are a couple of other inspirational photos I found:


Now I need your help!  Comment, and tell me what you think I should do with this slab of wood!


2.03.2012

Final Kitchen Plans

If you remember a post a while back about Kitchen Proposals for a family Remodel, we recently finished up revisions and have come up with the final product ready for bids!  They are in the process of pricing and finding their chosen General Contractor!  As soon as the constructions process starts, there will be fun updates on the job.


The final plan is based on the second option I had for them which involved a complete gut-job of the existing kitchen and rearranging the layout, plumbing of fixtures/appliances, new cabinets, and a more open space with easier access to the back deck!

Current kitchen photos for reference:


An early sketch of my notes on the job (incase you're curious-I take notes with sketches!):

I can't wait to get involved in the process and see the final product that will improve the daily life of this wonderful family!  Isn't it cool how design can improve life!

2.01.2012

More Entries Accepted


Some of my other entries were accepted for This Old House's 2012 Reader Remodel Contest under the category "Budget redo."  You can click HERE to see other entries on their website.  Unfortunately, you have to scroll through tons to see mine on there- and there are some pretty ugly entries on there...oh well, improves my chances! ha ha.


Bright, Fun Laundry Cabinet 

Sent by: Kara K., Prairie Village, KS

Image 1 of 6: After: Laundry closet


Before:


Remodel timeline: Less than a year

The hardest part: We had to have plumbing brought from the kitchen area to the new laundry spot by saw-cutting into the slab and digging to connect plumbing. We filled the trench with gravel and concrete, framed the closet, drywalled, mudded, painted, and made the countertop ourselves. Hired plumbing and electrical.
How we saved money: We did all of the work besides electrical and plumbing ourselves! We also reused an old cabinet from our bathroom (pre-bath remodel), painted it and hung it for detergent. We made the countertop with MDF and formica (so easy to clean), and spruced up boring bi-fold doors with cheap wall decals!
Other comments: We created this space by bumping into the back area of the garage off of the breakfast space inside.


Spruced Up Cabinets With Paint 

Sent by: Kara K., Prairie Village, KS

After: New tile backsplash in kitchen 


Before:


Remodel timeline: Less than a year

The hardest part: Sanding, de-glossing, priming, and painting all of the cabinets was not fun. Now I wish I had invested in a paint sprayer; it would have been way faster and easier! My mom and I do tile work, so the backsplash was no problem, but grouting was a little trickier and took longer than anticipated.
How we saved money: We reused the cabinetry but spruced up with paint, did the paint and tilework ourselves, and replaced the sink and faucet with more mid-range options. Although I would have loved quartz, the price of countertops were kept down by using corian in a concrete color look-alike.
Other comments: The washing machine was actually in the kitchen where the recycling containers now are. We moved it into a new laundry closet we built (another project entry!) so that we could have extra counter space! We used this new area for glasses to hang above as a drink station and recycling bins beneath.


Bright Remodel Livens Small Bath 

Sent by: Kara K., Prairie Village, K

Image 1 of 6: After: Finished bathroom


 Before:


Remodel timeline: Less than a year

The hardest part: Learning how to mud/tape drywall was quite the experience! I had to have a friend come and redo the horrible mudding job I did! Demolition was fun, but harder work than I realized. Knocking down all of the old shower walls/tile was labor-intensive — even just hauling the heavy stuff to the trash!
How we saved money: We did the demo ourselves, had a friend waterproof and tile the shower and floor, attempted to drywall ourselves, and did the caulking and painting! We got our plumbing/lighting fixtures from local hardware stores and floating shelves from IKEA.
Other comments: We also saved money by keeping the cast-iron tub, reusing the old sink cabinet for a workbench in the garage and painted the upper cabinet over the toilet for our laundry room! Another trick we used to make the room feel larger was taking the tile all the way to the ceiling in the shower!